Shower trays are one of the hardest-working joints in any bathroom. Every time someone steps in, the tray flexes slightly, water runs to the edges, and soap and shampoo sit along the silicone. Over time, even a decent seal gives up — and when it goes, it rarely looks as bad as the damage it is letting through.
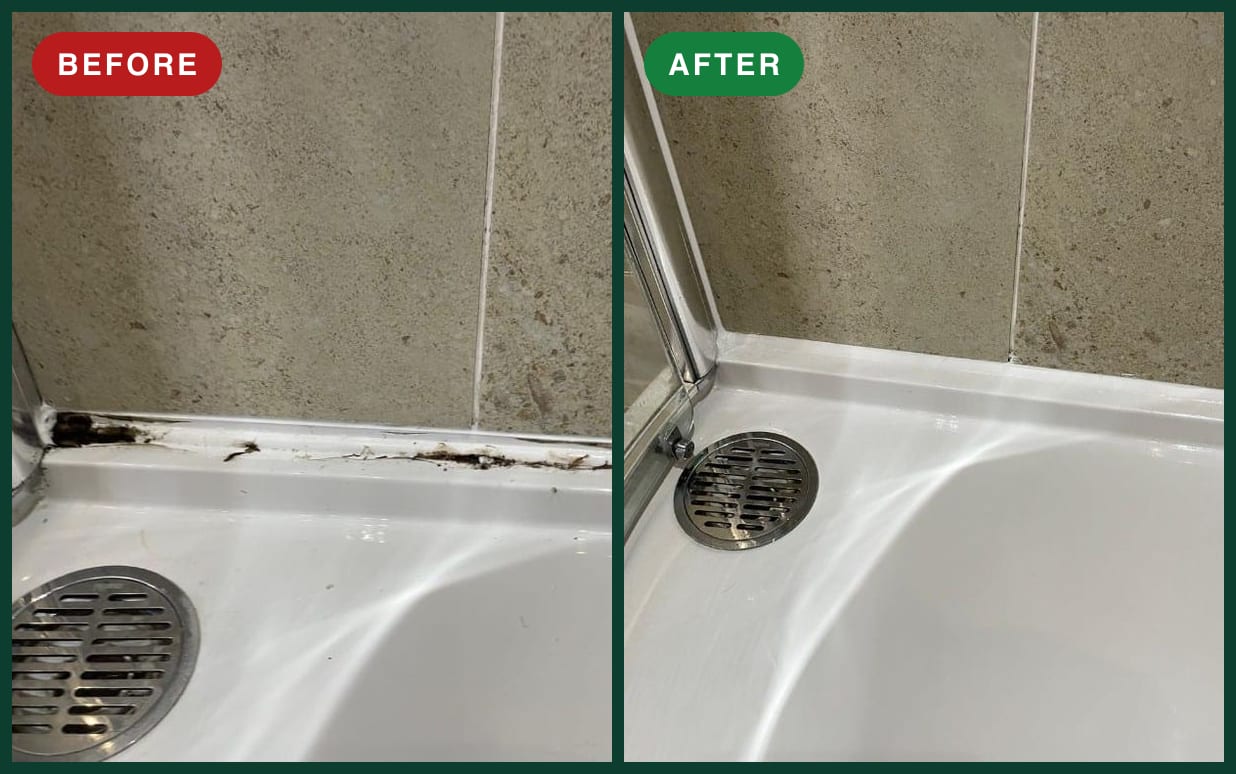
This shower tray reseal from a recent job in South Wales shows exactly what failed silicone looks like up close, and what a professional shower tray reseal should look like when it is finished.
Bathroom and shower sealing in South Wales
Before: What Failed Shower Tray Silicone Looks Like
The before photo at the top of this page shows the joint between a white quadrant shower tray and the stone-effect wall tiles, right next to the enclosure. At first glance it might pass as "a bit grubby". Look closer and the seal has completely failed:
- The bead has split and lifted away from the tiles along most of its length
- Black and brown mould has taken hold inside the gaps, not just on the surface
- Dirt and debris have been drawn in behind the silicone — a sure sign water has been getting in too
- The corner by the enclosure profile has broken open, which is one of the most common leak points on any shower
Once silicone has lifted like this, water from every shower tracks behind it. That water can reach the tray upstand, the wall behind the tiles and eventually the floor or the ceiling below. Cleaning the surface will not fix it — the mould is growing in the gap, not on top of the bead.
Why Shower Tray Seals Fail Faster Than Other Joints
Shower trays are tougher on sealant than almost anywhere else in the home:
- Movement. Trays flex under body weight, especially lighter acrylic or stone-resin trays. Each shower opens and closes the joint slightly.
- Constant water. Water pools along the edges and the lowest corner — usually next to the waste and the enclosure.
- Soap and product residue. Shampoo and shower gel build up along the bead and feed mould growth.
- Poor preparation first time round. Silicone applied over dust, damp or old sealant never bonds properly.
- Sealing over old silicone. A new bead over a failed one traps the mould underneath and peels off quickly.
This is why a shower tray that was sealed "only a couple of years ago" can look like the photo above.
After: A Clean, Watertight Shower Tray Reseal
The after photo shows the same shower and the same corner after a full reseal. The old silicone and the mould behind it have gone, and there is now:
- A continuous white bead along the full tray-to-tile joint
- A sealed corner at the enclosure profile, where the old seal had broken open
- A smooth, tooled finish that sheds water back into the tray instead of holding it
- Clean edges on both the tray and the tiles, with no smears on the stone-effect finish
It looks like a new shower — but the most important part is what you cannot see: a properly bonded, watertight joint.
How We Reseal a Shower Tray Properly
A good shower tray reseal is mostly preparation. The bead itself is the last few minutes of the job.
1. Remove all of the old silicone
Every trace of the old sealant comes out — along the tray, in the corners and up the enclosure profile. Leaving residue behind is the main reason DIY reseals fail. We take care not to scratch the tray, the tiles or the chrome.
2. Clean out mould and residue
The joint is cleaned to remove mould, soap scum and debris from inside the gap, not just the surface. New silicone will not bond to contamination.
3. Let the joint dry
Sealing into a damp joint is a common mistake. The gap needs to be dry before any new sealant goes in.
4. Seal with the tray loaded
Where practical, the tray is loaded with weight (or water) while the silicone is applied. That opens the joint to its widest point, so the bead does not tear the first time someone stands in the shower.
5. Apply a mould-resistant sanitary silicone
We use sanitary-grade silicone designed for wet areas, applied in one continuous bead and tooled to a smooth, even profile. White is most common for trays, but we can match other colours from our range.
6. Leave it to cure
Fresh silicone needs time to cure before the shower is used — we will advise on timing for the product used on your job.
When a Reseal Is Not Enough
A reseal fixes failed sealant. It will not fix a tray that rocks, sinks or moves noticeably when you stand on it. If the tray itself is loose or the waste is leaking, those need sorting first — otherwise the new bead will fail too. If we spot signs of that when we look at your photos or on the day, we will tell you honestly.
If your shower has black mould, peeling edges or gaps along the tray, our guide to the signs your bathroom silicone has failed is a useful next read.
Shower Resealing Across Cardiff, Swansea, Newport and South Wales
All Sealants provides professional shower, bath and bathroom resealing for homes across South Wales — including Cardiff, Swansea, Newport, Bridgend, Neath Port Talbot, Cwmbran and surrounding CF, NP and SA postcodes.
We reseal shower trays, enclosures, baths, basins and tiled corners, using mould-resistant products chosen for wet areas.
Get a free quote for shower resealing
Shower tray before and after — project gallery
View our standard sealant colours
Don't Wait for the Leak
Failed shower silicone is a warning sign, not a cosmetic issue. The sooner the old bead comes out and a proper seal goes in, the less chance water has to reach the wall, floor or ceiling below.
Is your shower tray silicone split, mouldy or peeling? Upload a few photos on our quote form and All Sealants will get back to you with a guide price for a professional shower reseal across South Wales.